Why Cleaning Diamond Burs Matters
After repeated use, diamond burs accumulate debris, biological material, and mineral deposits on their working surfaces. This buildup reduces cutting efficiency, increases friction, and shortens the overall lifespan of the instrument. Regular cleaning restores the exposed diamond grit and keeps each bur performing at its best.
Proper maintenance also plays a role in infection control. Residue left on a bur can harbor bacteria and compromise sterilization results. By following a consistent cleaning protocol, dental professionals protect both their patients and their investment in quality rotary instruments.
In this guide, we walk through two effective cleaning methods: manual cleaning with a sharpening stone and ultrasonic cleaning. Both approaches are widely used in dental practices, and choosing between them depends on your workflow, equipment, and the volume of burs you process each day.
Method 1: Manual Cleaning with a Sharpening Stone
Manual cleaning is the faster option and requires minimal equipment. It works especially well when you need to restore a single bur between patients or during a procedure. The technique relies on a dressing (sharpening) stone that physically strips debris from the diamond surface.
Step 1: Gather Your Supplies
Before you begin, make sure you have the following items ready:
- A high-speed or low-speed handpiece
- The diamond bur that needs cleaning
- A sharpening stone (also called a dressing stone)
- Cool running water and a clean sink
- A disinfecting solution with cleaning properties
- A soft-bristle brush
- A non-shedding wipe or compressed air for drying
Having everything within reach makes the process smooth and prevents cross-contamination from handling multiple surfaces.
Step 2: Use the Sharpening Stone
Insert the diamond bur into your handpiece and run it at the recommended maximum RPM. Wet the sharpening stone with water, then press the bur head fully into the stone for at least two seconds. The abrasive action of the stone dislodges caked-on material and re-exposes the diamond particles.
After the stone treatment, remove the bur from the handpiece and inspect the working end. You should see a noticeably cleaner surface with the diamond grit visible again.
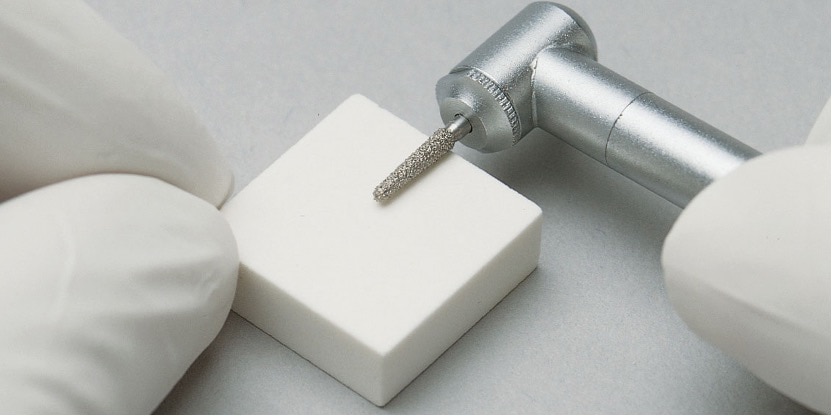
A wet sharpening stone removes debris and restores diamond grit exposure.
Step 3: Rinse, Soak, and Brush
Follow these sub-steps in order:
- Rinse the diamond bur under cool running water for at least one minute. This removes loose particles dislodged by the sharpening stone.
- Soak the bur in a disinfecting solution for a minimum of 10 minutes. The solution breaks down organic matter that water alone cannot remove.
- Brush the bur body with a soft-bristle brush for at least one minute. Work around the entire circumference of the head to clear any remaining debris from between the diamond particles.
- Final rinse under warm running water for at least one minute until the bur is visibly clean. Dry immediately using a non-shedding wipe or clean compressed air.
After drying, inspect the bur surface one more time. If residue remains, repeat the cycle from the sharpening stone step. Stubborn buildup sometimes requires two or three passes.
Method 2: Ultrasonic Cleaning
Ultrasonic cleaning is the preferred method for batch processing. It uses high-frequency sound waves to create microscopic cavitation bubbles in a cleaning solution. These bubbles implode on contact with the bur surface, removing debris from areas that manual brushing may miss. The result is a more thorough clean with less physical wear on the instrument.
Step 1: Load the Ultrasonic Unit
Place your diamond burs into a dedicated instrument block or cassette. Position the block inside the ultrasonic bath so that all bur heads are fully submerged in the cleaning solution. Avoid overcrowding the chamber, as this reduces cleaning effectiveness.
Step 2: Set Parameters and Run the Cycle
Configure the ultrasonic device according to the manufacturer guidelines for:
- Solution concentration -- use the recommended dilution ratio
- Water temperature -- typically between 40 and 60 degrees Celsius
- Cycle time -- at least 15 minutes for standard debris removal
Start the unit and allow it to run for the full cycle without interruption. The cavitation process works best when the solution temperature and concentration remain stable throughout.
Step 3: Rinse and Dry
Once the cycle is complete, remove the instrument block from the bath. Rinse each bur under warm running water for at least one minute, then dry with a non-shedding wipe or compressed air. This final rinse step is identical to the manual method described above.
Manual vs. Ultrasonic: Which Method Should You Choose?
| Factor | Manual Cleaning | Ultrasonic Cleaning |
|---|---|---|
| Speed per bur | Fast (2-5 minutes) | Slower (15+ minutes per cycle) |
| Batch processing | One bur at a time | Multiple burs simultaneously |
| Thoroughness | Good with careful technique | Excellent, reaches hidden areas |
| Equipment cost | Low (sharpening stone only) | Higher (ultrasonic unit required) |
| Physical wear on bur | Slightly more from stone contact | Minimal mechanical contact |
Many practices use both methods. Manual cleaning handles urgent mid-procedure needs, while the ultrasonic bath processes the full day's instruments in a single run.
After Cleaning: Sterilization
Cleaning removes visible debris, but it does not sterilize. After every cleaning session, burs must go through an autoclave cycle before reuse on patients. Place the cleaned and dried burs into sterilization-compatible bur blocks, then load them into the autoclave following your standard protocol.
Using dedicated bur blocks for sterilization keeps instruments organized and prevents damage during the heat cycle. It also streamlines the workflow so burs are ready to use as soon as they come out of the autoclave.
Standard autoclave settings for dental burs are 134 degrees Celsius at two bar pressure for a minimum of three minutes. Always verify your autoclave's validated cycle parameters and confirm that the bur block material is rated for the temperatures involved. Some plastic organizers are not autoclave-safe and can warp or melt during the cycle.
Tips to Extend Diamond Bur Life
Beyond regular cleaning, a few habits help diamond burs last longer:
- Use light pressure -- let the diamond grit do the work. Excessive force accelerates wear and generates unnecessary heat.
- Match the bur to the task -- coarse grit for bulk removal, fine grit for finishing. Using the wrong grit forces the bur to work harder than necessary.
- Rotate your inventory -- cycling through multiple burs instead of relying on one extends the working life of each instrument.
- Inspect before each use -- look for missing diamond particles, bent shanks, or discoloration that signals the bur is past its useful life.
- Store properly -- keep burs in dedicated holders or blocks to prevent accidental damage from contact with other instruments.
If you are also working with tungsten carbide burs, note that their cleaning process differs somewhat due to the fluted cutting surface. Check our carbide bur guide for details on maintaining those instruments.
Common Cleaning Mistakes to Avoid
Even experienced clinicians sometimes develop habits that shorten bur life or reduce cleaning effectiveness:
- Skipping the soak step -- brushing alone cannot break down dried-on biological material.
- Using abrasive metal brushes -- these can strip diamond particles from the bur surface. Always use soft-bristle brushes.
- Reusing contaminated solution -- ultrasonic bath fluid should be changed at least daily, or more often in high-volume practices.
- Air-drying without rinsing -- cleaning solution residue left on the bur can interfere with sterilization and cause corrosion.
Following a consistent protocol avoids these pitfalls and keeps your instruments performing reliably for their full expected lifespan. For more information about dental bur sterilization best practices, see our dedicated guide.