Diamond Drill Bits for Wood Carving: A Selection Guide
Diamond drill bits are among the most practical tools a wood carver can own. Whether you are roughing out a figure, adding fine detail to a relief panel, or smoothing a finished surface, the right diamond bit makes the job faster and more controlled. This guide covers the four essential bit shapes, how grit size affects your results, and the speed settings that keep both the tool and the workpiece in good condition.
Why Diamond Drill Bits Work Well on Wood
Standard steel burrs cut wood effectively, but they dull quickly on hardwoods and dense burls. Diamond-coated bits hold their edge far longer, and the abrasive surface produces a cleaner cut with less tear-out on end grain. For carvers who work with exotic hardwoods like ebony, rosewood, or olivewood, diamond bits are a worthwhile investment because they maintain consistent cutting performance over many hours of use.
Diamond bits also generate less heat than steel at equivalent speeds, which reduces the risk of scorching the wood surface. This is especially important when working on detailed areas where burn marks are difficult to sand away without losing definition.
Four Essential Diamond Bit Shapes
Each bit shape is designed for a specific range of tasks. Keeping all four in your kit gives you full coverage from rough shaping to fine detail work.
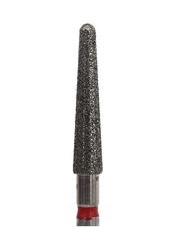
Cone-Shaped Bits
Cone bits taper to a point and are the go-to choice for carving fine lines, V-grooves, and detailed textures. The pointed tip lets you reach into tight corners and trace along pencil lines with precision. Use them for adding hair texture, leaf veins, feather barbs, and lettering.
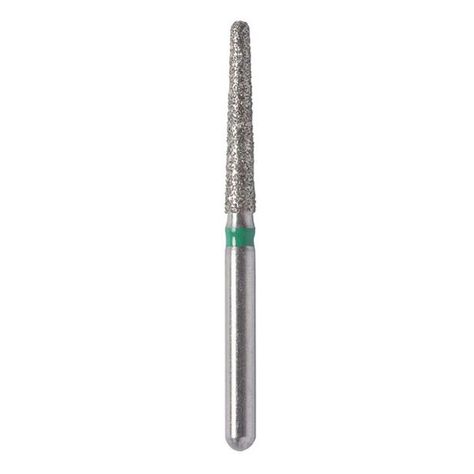
Tapered Bits
Tapered bits are similar to cone bits but with a sharper, more elongated profile. This makes them better suited for ultra-fine detail work and for reaching into narrow recesses. They excel at carving intricate patterns such as Celtic knotwork, scrollwork, and small lettering where the standard cone bit would be too wide at the base.
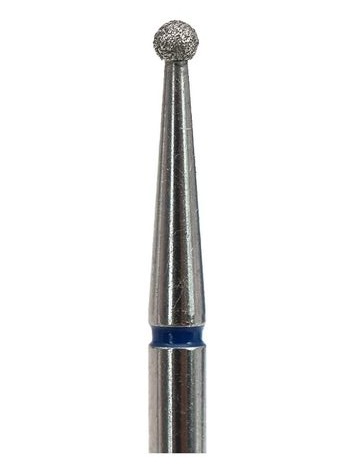
Ball-Shaped Bits
The spherical head of a ball bit removes material quickly and evenly, making it ideal for hollowing, rounding concave surfaces, and roughing out large areas. Ball bits are also useful for creating smooth, rounded channels and for blending transitions between different planes of a carving. If you could only own one diamond bit shape, the ball would be the most versatile choice.
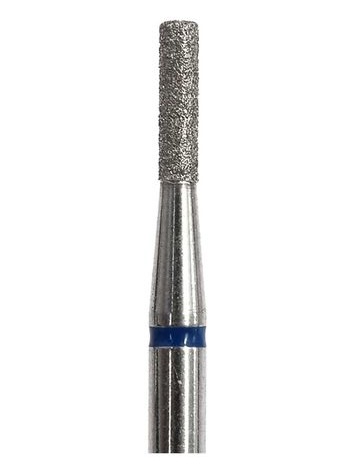
Cylinder-Shaped Bits
Cylinder bits have a flat end and straight sides, which makes them the right tool for flattening surfaces, smoothing walls, and trimming material to a uniform depth. Use them to clean up flat backgrounds on relief carvings, level the bottom of a routed recess, or remove tool marks before sanding. The flat cutting face leaves a predictable, even surface that requires less finishing work.
Bit Shape Selection Table
| Bit Shape | Best For | Typical Tasks |
|---|---|---|
| Cone | Fine lines and grooves | Lettering, veins, V-cuts, texture lines |
| Tapered | Ultra-fine detail | Scrollwork, tight recesses, intricate patterns |
| Ball | Rounding and hollowing | Concave surfaces, roughing, blending transitions |
| Cylinder | Flat surfaces and walls | Background leveling, trimming, surface smoothing |
Understanding Diamond Grit Sizes
The grit coating on a diamond bit determines how aggressively it cuts. Choosing the right grit for each stage of your project prevents unnecessary sanding and reduces the chance of removing too much material.
Coarse Grit (60-120)
Coarse diamond bits remove material quickly. Use them for the initial roughing stage when you need to establish the basic form of your carving. They leave visible scratch patterns that will need to be refined with finer grits. Coarse bits work especially well on softwoods like basswood and butternut, where fast material removal saves significant time.
Medium Grit (150-240)
Medium grit bits are the workhorse of most carving sessions. They remove material at a moderate rate while leaving a reasonably smooth surface. Use them for shaping, refining contours, and removing the scratch marks left by coarse bits. Most detail carving is done at this grit level.
Fine Grit (300-600)
Fine grit bits are used for final smoothing and polishing. They remove very little material and produce a surface that may not need sanding at all on hardwoods. Use them as the last step before applying finish, or to polish areas that are difficult to reach with sandpaper. For an even smoother result, follow up with silicone polishers mounted on a mandrel.
Recommended Grit Progression
- Step 1: Rough shaping with coarse grit (60-120)
- Step 2: Refine contours and add detail with medium grit (150-240)
- Step 3: Final smoothing with fine grit (300-600)
- Step 4: Optional polish with felt bobs or silicone points
Speed Settings for Wood Carving
Running your rotary tool at the correct speed protects both the diamond coating and the wood. Too fast, and you risk scorching the wood or wearing the diamond abrasive prematurely. Too slow, and the bit will chatter and leave a rough surface.
| Task | Recommended RPM | Notes |
|---|---|---|
| Detail carving (softwood) | 8,000 - 10,000 | Low speed prevents tear-out on soft fibers |
| Detail carving (hardwood) | 10,000 - 12,000 | Slightly higher speed for clean cuts |
| Roughing and shaping | 12,000 - 15,000 | Higher speed for faster material removal |
| Smoothing and polishing | 8,000 - 12,000 | Moderate speed with fine grit or polisher |
Starting tip: Always begin at the low end of the range and increase speed gradually until the bit cuts smoothly without vibration. If you see smoke or smell burning, reduce speed immediately and check that the bit is not clogged with wood dust.
Practical Techniques for Better Results
- Light pressure: Let the diamond abrasive do the cutting. Pressing hard does not speed up material removal; it just wears out the bit and heats the wood.
- Keep the bit moving: Holding the bit in one spot creates divots and burn marks. Use steady, sweeping strokes along the grain direction.
- Clear dust frequently: Wood dust packs between diamond particles and reduces cutting efficiency. Blow or brush away dust every few minutes, or use a vacuum attachment.
- Work with the grain: Cutting against the grain causes tear-out, especially on softwoods. Adjust your carving direction to follow the fiber pattern.
- Use a flex shaft: A flex shaft attachment gives you a lighter, more maneuverable handpiece than gripping the rotary tool body directly. This improves control on detail work and reduces hand fatigue during long sessions.
Choosing the Right Bit Material
Diamond-coated bits come in two main construction types that matter for wood carving:
- Sintered diamond bits: Diamond particles are embedded throughout the metal matrix. These last longer and can be dressed to expose fresh diamond. Best for extended carving sessions and production work.
- Electroplated diamond bits: A single layer of diamond is bonded to the steel shank. These are less expensive and offer a more aggressive initial cut, but they cannot be resharpened. Good for hobbyists and occasional use.
For most wood carvers, a set of laboratory-grade diamond burs in HP (handpiece) shank provides excellent value. These bits fit standard rotary tools and flex shafts with a 2.35mm collet and are available in all four essential shapes.
Maintaining Your Diamond Bits
Diamond bits require minimal maintenance, but a few simple habits will extend their working life:
- Clean bits after each use with a brass wire brush to remove embedded wood fibers. Learn more about brush types in our wire brush comparison guide.
- Store bits in a holder or case where they cannot contact each other. Diamond-on-diamond contact chips the coating.
- Inspect bits periodically for worn spots. A bit that has lost its diamond coating in patches will cut unevenly and should be replaced.
- Do not use diamond bits on metal unless they are specifically rated for it. Cutting steel or iron with a wood-carving bit destroys the coating quickly.
If you are interested in applying similar rotary tool techniques to other materials, our guide on how to make a wooden ring covers shaping, sanding, and finishing a complete project from start to finish.
