
If our teeth are damaged and affect their normal use, many times we will use porcelain teeth as a means of dental restoration. Many people think it is very painful to do porcelain, so they have been very resistant. If you know the process and have a general idea of what it's like and whether it's painful or not, here's a detailed guide to each of the steps.
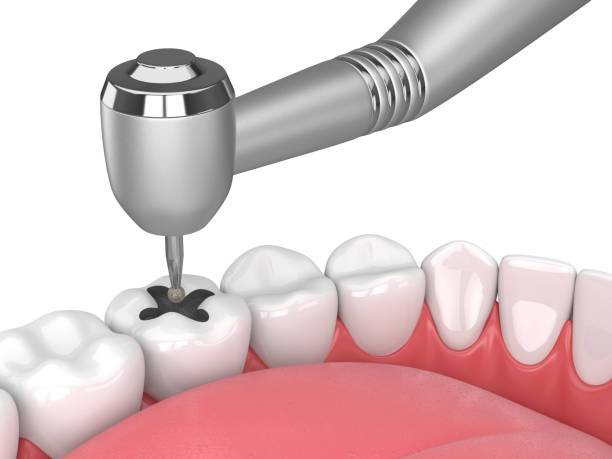
Step 1: Grind the bad teeth
In order to ensure that the finished porcelain crown does not exceed the thickness of the original external teeth, a diamond bur is generally used to remove part of the natural teeth for porcelain teeth. In addition, in order to keep the denture in place and obtain good retention, the abutment should be prepared into a certain shape. The quality of abutment preparation is related to whether the denture is easy to wear and firm.
Step 2: The teeth were recorded with an abrasive tool
Before the porcelain tooth is sent to the factory, the doctor must make a record of the condition of the prepared tooth to provide the basis for the porcelain tooth's production. There are two steps: first, take the rough impression, that is, take the rough impression with silicone, trim the concave part, and repair the overflow channel. Then take a fine impression by touching: use silica gel on a fine body to take a fine impression. Require no pressure reset and fine printing on colour uniforms. In addition, it is necessary to make the jaw record using the wax or silica gel method for the production factory to grasp the dynamic jaw relationship.
Step 3: Contrast colour with natural teeth
In order to ensure that the porcelain tooth is similar in colour to the original or adjacent tooth, the doctor must quickly scan the colorimeter and compare it with the colour of the affected tooth to determine the approximate range of colours on the colorimeter. Requirements: Under natural light, select the colour in the upper 1/3 region of the crown of natural teeth and take the colour of this region as the main keynote color; then, compare the colour of the neck and the cut end with the main colour to determine the colour of these two areas. Because the colour of the neck, the middle part, and the cutting end of the tooth are not consistent, the brightness of the cutting end is the highest, and the colour of the neck is the highest. A series of digital coloration photos are taken conditionally and sent to the technician in the form of a U disk. Therefore, a comprehensive analysis is necessary. After an accurate colour comparison, it can be sent to the factory for processing.

Step 4: Try bonding
About 1 week later, the porcelain teeth can be finished by grinding and polishing with polishers . First of all, after trying, check the tightness of the shoulder, that is, the suitability of the crown edge should meet the standard, whether the colour is consistent, whether the shape is beautiful, and the adjacency relationship, bite relationship, etc. If it is confirmed that there is no problem, the doctor uses a special adhesive to attach it to the pre-repaired tooth, and the restoration work of the porcelain tooth is complete.