How to Remove Acrylic Nails Without Acetone: Safe Drill Method at Home
Can you remove acrylic nails without acetone? Yes. A controlled nail drill method can remove bulk acrylic safely without acetone by reducing thickness gradually, switching to finer bits, and finishing with gentle hand filing instead of peeling.
Why Choose an Acetone-Free Removal Method?
An acetone-free approach helps avoid over-drying the natural nail and surrounding skin while giving you more control over how quickly material is removed.
Safe Drill Steps for Acrylic Removal
Step 1: Use a coarse carbide or ceramic bit at a controlled speed to debulk the top acrylic layer.
Step 2: Switch to a medium grit bit as the acrylic becomes thinner to reduce heat and over-filing risk.
Step 3: Finish the last thin layer with a fine bit or hand file so you do not cut into the natural nail.
Step 4: Smooth the surface, clean away dust, and apply cuticle oil after removal.
How to Remove Acrylic Nails at Home Using Professional Drill Bits
Removing acrylic nails at a salon can be expensive, especially when you need regular maintenance. The good news is that with the right nail drill bits and proper technique, you can safely remove acrylic nails at home and save money without sacrificing quality. This guide walks you through the entire process, from selecting the correct bits to aftercare for healthy natural nails.
Why Use Nail Drill Bits for Acrylic Removal?
Soaking acrylic nails in acetone is the traditional removal method, but it can take 30 to 45 minutes and leaves nails dry and brittle. An electric nail drill with the right bit reduces removal time to about 10 to 15 minutes. The key is choosing the correct bit for each stage of the process and using proper speed settings to avoid damaging your natural nail bed.
Professional nail technicians rely on specific drill bit shapes and materials for different tasks. Understanding these tools allows you to replicate salon-quality results in your own home.
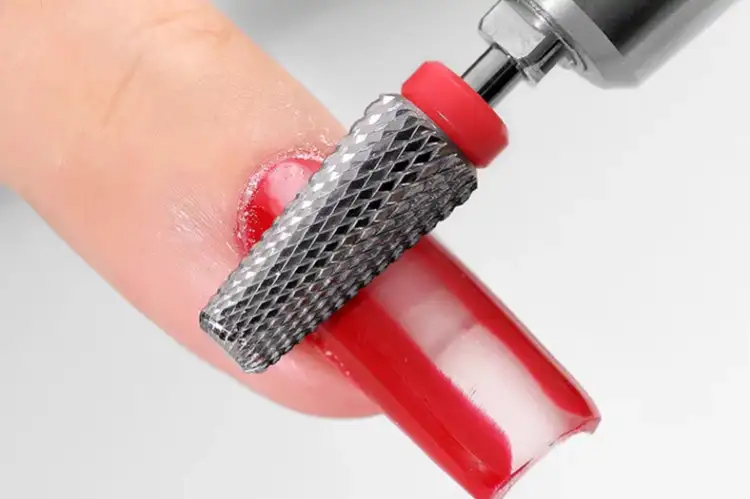
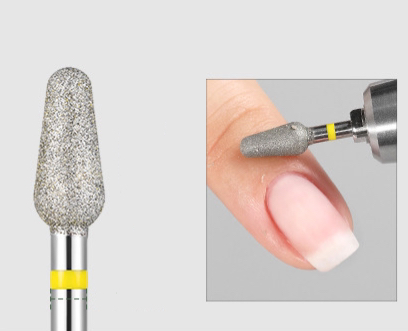
The Fish-Scale Tungsten Carbide Nail Bit
The fish-scale tungsten carbide bit is your primary tool for bulk acrylic removal. Its unique scraping pattern sets it apart from standard carbide bits in several important ways.
Key Advantages
- Efficient material removal: The unidirectional chip evacuation design cuts through acrylic quickly while producing less airborne dust than conventional bits.
- Even surface results: The scraping action removes material uniformly, preventing pits and grooves on the nail surface that could damage the nail bed underneath.
- Long-lasting durability: Tungsten carbide is one of the hardest materials available for rotary tools. A quality carbide bit will last through dozens of removal sessions before needing replacement.
- Works on multiple nail types: Whether you have gel overlays, hard gel extensions, or acrylic nails, this bit handles all of them effectively.
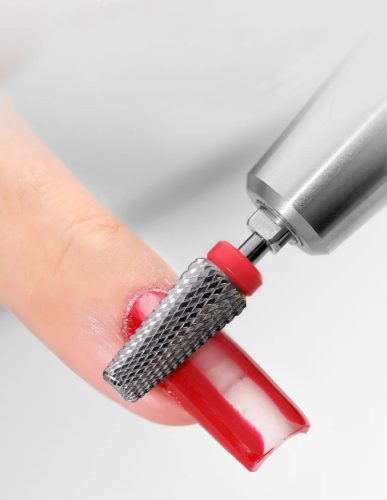
How to Use It for Acrylic Removal
- Prepare your workspace: Gather your electric nail grinder, the fish-scale carbide bit, safety glasses, and a dust mask. Work in a well-ventilated area and lay down a towel to catch debris.
- Install the bit securely: Insert the carbide bit into your nail drill chuck and tighten it firmly. A loose bit can wobble during use and cause uneven removal or injury.
- Clean and disinfect: Wipe your hands and nail surfaces with an appropriate disinfectant before starting. This prevents bacteria from entering any micro-abrasions created during the process.
- Set the correct speed: Start at 15,000 RPM for thicker acrylic layers. You can increase up to 25,000 RPM as you become more comfortable, but beginners should stay in the lower range.
- Remove the acrylic: Hold the bit at a slight angle to the nail surface. Use smooth, sweeping motions across the nail from cuticle to tip. Never hold the bit in one spot for more than a second, as friction generates heat that can burn the nail bed.
Pre-Treatment: Preparing the Nail Area
Before you begin removing acrylic, proper cuticle preparation makes the entire process smoother and reduces the risk of injury. Two specialized diamond bits handle this stage.
Diamond Drill Bit for Cuticle Work
A pointed or tapered diamond bit is used for pushing back the cuticle and separating keratin buildup attached to the natural nail. This step opens up the nail grooves and creates small pockets that make acrylic removal easier.
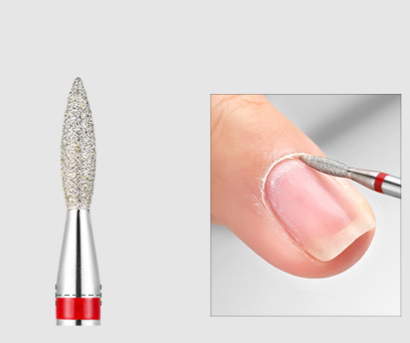
Run the diamond bit along the cuticle line at low speed (8,000 to 12,000 RPM). Use gentle pressure and let the diamond abrasive do the work. The goal is to lift and push back the cuticle, not to cut it.
Flat Cone Diamond Nail Bit
The flat cone shape conforms to the nail surface better than pointed bits, making it ideal for removing dry skin attached to the nail plate and clearing keratin from the cuticle area. Its angled profile reaches into nail grooves and sidewalls where other bits cannot.
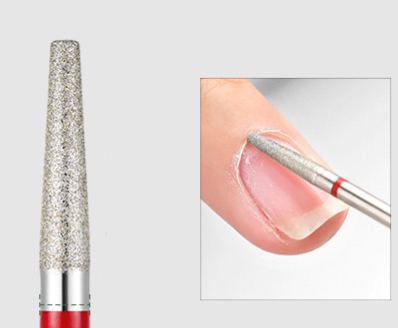
Work the flat cone bit along the lateral nail folds with light, controlled strokes. Keep the speed between 10,000 and 15,000 RPM for this step.
Finishing with the Round Cone Bit
After acrylic removal, the area around your nails will likely have rough skin, leftover keratin fragments, and small burrs from trimming. The round cone bit addresses all of these finishing concerns.
What the Round Cone Does
- Skin burr removal: Smooths rough edges and small tags of skin around the nail perimeter.
- Keratin cleanup: Clears fragmented keratin left behind after cuticle work.
- Finger polishing: Buffs the skin around the first knuckle joint, leaving the finger area looking clean and well-groomed.
Use the round cone at low speed with minimal pressure. This is a finishing step, so aggressive technique is unnecessary and counterproductive.
Speed Settings Reference Table
| Drill Bit Type | Task | Recommended RPM |
|---|---|---|
| Fish-scale carbide | Bulk acrylic removal | 15,000 - 25,000 |
| Diamond tapered | Cuticle preparation | 8,000 - 12,000 |
| Flat cone diamond | Dry skin and keratin | 10,000 - 15,000 |
| Round cone | Finishing and polishing | 8,000 - 12,000 |
Common Mistakes to Avoid
Even with the right tools, technique matters. Here are the most frequent errors beginners make during at-home acrylic removal.
- Staying in one spot too long: This generates heat that can damage the nail bed and cause pain. Keep the bit moving at all times.
- Using too much pressure: Let the abrasive surface of the bit do the cutting. Pressing hard increases heat, reduces control, and can thin the natural nail excessively.
- Skipping grit progression: Start with the coarser carbide bit for bulk removal, then switch to finer diamond bits for finishing. Jumping straight to a fine bit wastes time; using only a coarse bit leaves a rough surface.
- Ignoring dust protection: Acrylic dust is harmful when inhaled. Always wear a dust mask and work near ventilation.
- Neglecting aftercare: Your nails need moisture after drill work. Apply cuticle oil and hand cream immediately after finishing.
Aftercare for Healthy Natural Nails
Once you have finished removing the acrylic and completed your finishing work, proper aftercare protects your natural nails and promotes recovery.
- Apply cuticle oil generously: Massage oil into each nail and the surrounding skin. Jojoba oil or vitamin E oil works well for this purpose.
- Use a nail strengthener: A keratin-based nail treatment helps rebuild strength in nails that have been under acrylic for extended periods.
- Moisturize your hands: The entire process can dry out your skin. Apply a rich hand cream and consider wearing cotton gloves overnight for deep moisturizing.
- Give nails a break: If possible, wait at least one to two weeks before applying new acrylic or gel nails. This allows the natural nail to recover its strength and thickness.
Choosing Quality Nail Drill Bits
The quality of your drill bits directly affects both the results and the safety of at-home acrylic removal. Cheap bits can have uneven diamond coating, wobble during rotation, or lose their cutting ability after just a few uses. Investing in professional-grade tungsten carbide bits and diamond bits pays off in performance and longevity.
Look for bits made with medical-grade tungsten carbide and evenly distributed diamond grit. These produce smoother results with less heat buildup and last significantly longer than budget alternatives.
If you are new to using nail drill bits, our guide to picking the best drill bit for acrylic nail removal covers selection criteria in more detail. For broader information on different bit types, see our article on types of nail drill bits and their uses.
Final Thoughts
Removing acrylic nails at home is a practical skill that saves both time and money. The fish-scale tungsten carbide bit handles the heavy lifting, diamond bits prepare and clean the cuticle area, and the round cone bit provides a polished finish. By following proper speed settings, maintaining light pressure, and keeping the bit moving, you can achieve salon-quality results safely in your own home. Pair good technique with quality tools, and your natural nails will thank you.
Recommended Reading for Nail Drill Control
For bit selection, read Picking the Best Drill Bit To Remove Acrylic Nails. For operating technique, read How to Use Nail Drill Bits.
FAQ: Removing Acrylic Nails Without Acetone
Which bit is safest for acrylic removal? A carbide or ceramic bit is usually best for bulk removal, then a finer bit or hand file should be used near the natural nail.
Can I remove acrylics with a drill only? Yes, but only if you reduce pressure, control heat, and stop before the natural nail is over-filed.
What is the biggest mistake? Using too much pressure or staying in one area too long, which can create heat rings and thin the natural nail.
